- This wiki is out of date, use the continuation of this wiki instead
Tutorial:Setting up Fenix with Notepad++
From FenixWiki
| Revision as of 12:51, 17 August 2008 (edit) G105b (Talk | contribs) (New page: == Setting up Fenix with Notepad++ == For this tutorial, you must already have downloaded the Fenix binaries to a directory on your computer. Throughout the tutorial, the folder name XX...) ← Previous diff |
Current revision (12:51, 17 August 2008) (edit) (undo) G105b (Talk | contribs) (New page: == Setting up Fenix with Notepad++ == For this tutorial, you must already have downloaded the Fenix binaries to a directory on your computer. Throughout the tutorial, the folder name XX...) |
Current revision
Contents |
[edit] Setting up Fenix with Notepad++
For this tutorial, you must already have downloaded the Fenix binaries to a directory on your computer.
Throughout the tutorial, the folder name XXXXX will be mentioned; this should be replaced with the directory where your Fenix binaries are located. For example, you might have extracted the binaries to D:\Fenix\Runtime\092a\, then replace XXXXX with D:\Fenix\Runtime\092a (make sure that you don’t have an extra \ on the end – this will confuse Notepad++).
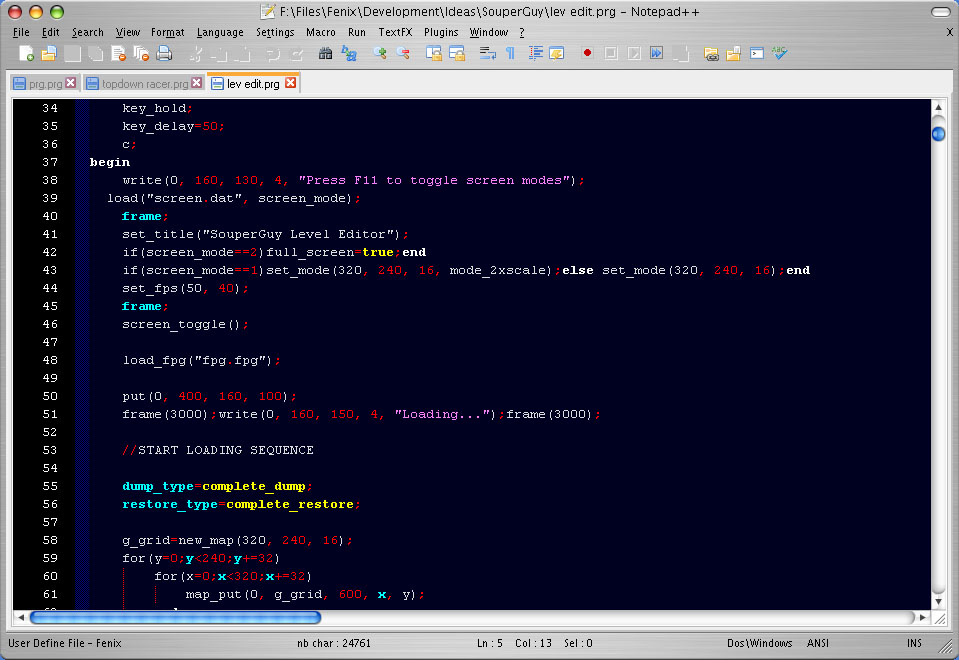
[edit] Screenshot
Here is a screenshot of Notepad++ editing a Fenix script, resembling the DIV Games Studio environment:

[edit] Advantages
Notepad++ is a completely free source code editor, and can be used as a Windows Notepad replacement. It comes with a range of highlighters for all main programming languages.
The editor supports auto-completion and code-lookup. Along with other perks, you can zoom in and out of your code, add bookmarks and record macros. Also, the editor will highlight braces and brackets to show what you are currently editing inside.
When the editor is set up as in this tutorial, all runtime files for your Fenix projects will only need to be in one directory on your computer, this brings advantages like saving disk space, updating a certain file is much easier and automatically affects all programs using it, not just one.
[edit] Install Notepad++
First off, you need to download and install Notepad++ from its website, [1]. You can find details on the website for how to install. When installed, you need to download some XML files and place them in the Notepad++ directory to make the Fenix highlighter work properly.
[edit] Syntax Highlighter
You need to download Notepad++Highlighter.rar and put it in your Notepad++ install directory, overwriting some files. When you edit a Fenix script now, the syntax will be highlighted just like in DIV Games Studio. If you start up Notepad++ from scratch, you will need to click Languages -> Fenix, or you could just save the empty file as a .prg and the program will be recognized as a Fenix script.
[edit] Hotkeys
To set up hotkeys to compile and run your Fenix program, you need to do a slight bit of editing of settings and batch files. It is relatively straightforward, and as a programmer, you will be able to do this very easily.
Firstly, you need to download NotepadPlusPlus_FXC.rar and edit one line of it (you can use Notepad++ to edit the batch file if you want). The line you need to edit is the second line down. At the moment, the line looks something like this: “XXXXX\fxc.exe” %0 %1 %2 %3 %4 %5 %6 %7 %8 %9
You need to change the XXXXX to the location of your Fenix runtime (the directory with FXC.exe and FXI.exe in. So now the line might read: : “D:\Fenix\Runtime\092a\fxc.exe” %0 %1 %2 %3 %4 %5 %6 %7 %8 %9
Remember to include your Fenix directory AND fxc.exe within quotation marks, and not to include an extra \ at the end.
Now you can assign a hotkey to Notepad++. Do this from going to the menu Run -> Run… and locate the FXC.BAT file. At the end of the file name you need to add a few extra words, to make the batch file know what file it is going to compile. Let’s say that the batch file is located at D:\Fenix\Runtime\FXC.bat, you will need to type the following into the Run dialogue box:
D:\Fenix\Runtime\FXC.bat $(FULL_CURRENT_PATH)
Now you can click Save As, and assign a hot key. A suggested hotkey for this is F6, as most editors use the F6 key to compile.
To assign another key to run the compiled code, you will need to type the following into the Run dialogue box (assuming your Fenix runtime directory is the same).
D:\Fenix\Runtime\FXI.exe $(CURRENT_DIRECTORY)\$(NAME_PART).dcb
Again, click Save As,a nd assign a hot key. A suggested hotkey for this is F5. But to use F5 for run, you will need to re-map Notepad++’s current use for F5. You can do this by going to Settings -> Shortcut Mapper, and right clicking number 117 and changing it to Shift + F5.
